Tuesday, October 29, 2013

Chicken and spinach or 3 cheese ravioli with a mustard cream sauce.

Pasta Dough:

  • 2 cups semolina  flour (regular will do if you need)
  • 3 eggs
  • 2 tsp. salt
  • 2 Tbs. Cold water
In a mixer with a dough hook, start by mixing the flour and salt then slowly add in the eggs and mix until it forms a ball. If the mixture is dry, add in a little water at a time. Then take the ball out and knead for about 10 minutes and put the dough in the fridge to set for at least 30 minutes. 


Filling:

  • 4 button mushrooms-minced finely
  • 1/4 of an onion-minced finely
  • 1 large chicken breast-boiled just till cooked then chopped roughly
  • 2tbs butter
  • 1 tsp minced garlic
  • 1/2 bunch of spinach (about 1.5-2 loose cups)
  • 1/4 cup parmesan- shredded
  • 1/4 cup mozzarella-shredded


Saute the first five ingredients together in a pan until cooked.


Then place in a food processor with the spinach and process for 15-30 seconds. Don't let it turn into a paste but get everything finely processed.


Let cool then add in the cheese and process until mixed.


Filling 2:
  • 1 cup ricotta
  • 1/2 cup parmesan
  • 1/2 cup mozzarella
  • 1 cup sauteed diced mushrooms
mix together


Knead the pasta dough for a few minuted and break off a chunk about the size of a golf ball. Send it though your pasta machine's largest setting a few times, folding it back over itself and going through again. Then reduce the width setting and do it again. Do it on each setting twice. Once just send it through and then fold it in half and do it again. Go to about the middle thickness setting. Too small and it breaks.

Option 1: Then slice the dough into squares. Place a tablespoon of the filling just off center on the square. Use a little water to wet the edges. Then fold two corners together to form a triangular ravioli. Carefully press out the air and use a fork to crimp the edges. Repeat this process for the remaining dough and filling.


Option 2: 
Get one of these awesome ravioli tins. This made the process so much easier. Grease the pan then flour it well. You lay out one of the sheets of pasta and carefully put the filling into the indentations. 

Then place another pasta layer on top and carefully press out any air bubbles. Then use the little rolling pin and it cuts them for you. Periodically re-grease and flour the tin.


Set a large pot to boil with salted water in it.


Sauce:

  • 1 shallot diced finely
  • 2 Tbs stone ground mustard
  • 1 can chicken broth
  • 3 tbs. cream
  • 2 tbs. Parmesan cheese


Start by sauteing the shallots in a little bit of oil on medium heat until they start to brown.


Add in the mustard and broth and wine and simmer until the sauce has reduced by about half.


At the point, add your ravioli to the boiling salted water and add the cream and Parmesan to the sauce mixture. Whisk the sauce for 2-3 minutes.


When the ravioli float to the top of the pot, wait about a minute and scoop them out with a slotted spoon. Serve with the sauce a sprinkle of Parmesan over top. It may take 3-4 batched to do all the ravioli.


Tuesday, October 22, 2013

Alfredo Sauce for 2


  • 2 Tbs. Butter
  • 1.5 cups grated Parmesan cheese (not the powdered kind)
  • 1 cup cream
Melt the butter in a double boiler over low heat. Add in the cream and Parmesan and cook over low heat for at least 20 minutes stirring often. After 15 minutes start the water for your pasta. Cook the pasta according to the directions on the package. When the pasta is done, coat the noodles with sauce. 

This meal is delicious with garlic butter shrimp and steamed green beans. 

You can go traditional with fettuccine noodles or change things up with other kinds. My favorite is radiatori. The ridges hold the sauce really well.


You can easily make a double boiler by placing a small pot inside a slightly larger pot. The outside pot should have an couple inches of water. Enough that the smaller pot touches the water but not enough that it boils over the edges when the water boils. 

Tuesday, October 15, 2013

Polenta

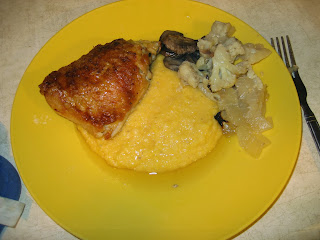
Chicken and Polenta:


  • Chicken thighs
  • ½ head of cauliflower- cut into florets
  • ¼ lbs. of mushrooms
  • ½ a large onion-sliced
  • 1/3 can of chicken broth

Grease a square baking dish and put in the cauliflower, mushrooms, and onions in it and season with salt and pepper. Pout the chicken broth over the top. Bake at 400 for 15 minutes. Stir the veggies. Season the chicken thighs and place them on top. Bake at 375 for 75 minutes. Every 20 minutes or so, stir the veggies and baste a little of the broth over the skin of the chicken.
You can also make a simple gravy with the remaining chicken broth to pour over the top of everything.


1/2 cup corn meal-medium-fine ground
1 2/3 cans chicken broth
½ cup grated cheese (cheddar or parmesan)
3 Tbs. buttermilk
2 Tbs. butter

Start by putting the corn meal and 1 cup of broth in a pot on low-medium heat. Stir often with a whisk. As the liquid evaporates and cooks in, add ¼ cup of broth at a time until you are out of broth. Keep stirring. There should still be some texture to the polenta but not gritty. At the end, add in the buttermilk for a bit of tang and the cheese and butter. Stir well.


Serve a ½ to ¾ of a cup of polenta with a piece of chicken and some veggies over top.


If you have leftover polenta, form it into a log shape in some plastic wrap and stick it in the freezer. Next time you want polenta you can thaw it out, cut slices off and fry them in a shallow pan of oil. 


Sausage, peppers, and onions with polenta and a red wine gravy. 

  • polenta
  • 6-8 sausages
  • 2 peppers-sliced
  • 1 onion sliced
  • 1 can stock
  • 1 cup red wine
  • 2 Tbsp. corn starch
While the polenta is cooking, cook up the sausages in a pan and set them aside. Saute the onions and peppers in the same pan with some oil until the onions start to get transparent and everything starts to brown. Set aside. De-glaze the pan with the red wine. Then add in the stock and simmer for 3 minutes. Mix the corn starch in a little water until it dissolved mostly and then slowly stir in the corn starch to the boiling liquid. Simmer until it thickens a bit. Serve the sausage and veggies over the polenta with some gravy.


Tuesday, October 8, 2013

Lavender Chocolate Pots De Creme

Lavender is one of my favorite flavors. After trying a few different recipes, this is my version of the deliciously decadent Lavender Chocolate Pots de Crème. Pots de crème are a custard dessert in between the thickest- crème brulee and the lightest-flan.


2 cups cream, ½ cup milk
3 tablespoons dried lavender flowers
6-7 oz. semisweet chocolate chips
3 egg yolks and three whole eggs
¼ cup sugar

1 cup cream
2 tbs sugar
1tsp vanilla

Slowly warm the cream and lavender together in a small pot over the stove for 20-30 minutes, then put the pot in the fridge for at least 2-3 hours. The longer the lavender sits in the cream, the stronger the flavor will be. Once it has chilled long enough, warm it a little, and strain out all the lavender flowers. Put the cream back in the pot with the chocolate chips and slowly melt everything together, mixing well.Make sure the chocolate is completely melted and blended in the cream. Preheat the oven to 325.


At the same time, mix the eggs and sugar in a mixer until foamy.Be careful not to over mix.


When the chocolate is melted, let it cool for just a minute or two then add into the eggs with the mixer running. Make sure your cream mixture isn't too hot or it could start cooking the eggs early and then you get a slightly scrambled egg texture in the custard.  Then put the mixture into six ramekins. Place the ramekins in a baking dish with water that goes halfway up the sides of the ramekins.


Bake for 45-55 minutes and then chill the ramekins for 2-3 hours. The custards should still have some jiggle to them when you take them out. Since my ramekins were different sized, I cooked the larger ones 10 minutes longer than the shallow ones.


1 cup cream
2 tbs sugar
1tsp vanilla

Top with homemade whipped cream by putting the cream, sugar and vanilla in a mixer at medium speed until the cream thickens.


Tuesday, October 1, 2013

Fruit crisp

For her birthday or Mother's Day, my mom usually requests homemade peach crisp. Since she is allergic to fresh peaches, she can't make it herself (her arms and hands start to itch). So, one of her presents is that someone else peels and cooks the peaches. It is the same with fresh corn on the cob too. She loves eating it, but can't touch it till it's cooked.

This crisp recipe is great with peaches, apples, pears, or plums. With pears, be careful with the liquid. They have a lot more water in them so pick some that aren't super juicy. The amount of sugar you'll use on the fruit itself depends on both how sweet the fruit is and how sweet you want your crisp. There is sugar in the topping so make your fruit mix a little less sweet than you want your end product. With apples, pears and canned peaches, we tend to not add any sugar

This recipe is going to use plums, because I got a great deal on them at the grocery store this week.


  • 8 medium plums- sliced this or diced
  • 1/4-1/2 cup brown sugar
  • 1 tsp cinnamon
  • 1/2 tsp vanilla
Mix these ingredients together in a bowl them put in a greased 9x13 glass baking dish.


  • 1/2 cup butter- melted
  • 2 cups flour
  • 3/4 cups sugar
  • 1 egg
Mix these ingredients together until the mixture is slightly crumbly. If there is too much liquid, add more flour. If it is too dry, add more melted butter. You can also get a drier, more crumbly texture by replacing the egg with 1/4 cup more of melted butter.


Top the fruit with this crumb mixture over the top.


Bake at 350 F for 30-45 minutes or until the top is slightly browned and the fruit is cooked through.